
Sellozo Release Notes July 2025
- Cameron Meneer
- Jul 23, 2025
- 5 min read
We are thrilled to announce that the much-awaited Sponsored Display launch flow is finally here making Sellozo one-stop-shop to launch all your campaigns through a very user-friendly and intuitive interface.
This release also includes an important update to Autopilot allowing users to seed their targeting to their Autopilot campaigns eliminating the need of adding keywords manually after the launch. Another highlight of this release is the new toggle on the trends/compare charts for Event/Order data allowing users to switch between their events and orders data on the Dashboard and ProductVu. You’ll notice a few cosmetic improvements throughout the app that enhance overall usability and design.
New features:
Introducing a new campaign type ‘Sponsored Display’ on the Campaign launch screen
We’ve added Sponsored Display as a new campaign type in the Campaign Launch screen. You now have all the campaign types including Sponsored Products, Sponsored Brands, and the new Sponsored Display added separately. This makes it easier for you to choose the type of campaign you want to launch making the process smoother, more intuitive user experience.

Discover the intuitive new launch flow for Sponsored Display
We are thrilled to announce the rollout of Sponsored Display campaigns’ launch flow. This update will streamline your advertising setup, making it easier than ever to launch all different types of campaigns all at one place that drive results within Sellozo.
The new flow guides you step by step through the campaign launch process with clear, concise instructions. We've also enhanced the targeting and audience selection capabilities, allowing you to search for the right audiences and bid accordingly to maximize your reach.
We’re excited for you to explore the new experience!
Step 1 (Campaign Details): You are required to add all the relevant campaign details like Campaign and ad group name, Daily Budget, Target ACoS, start and end date. It also has a standalone SD campaign pattern on the right to show how this campaign will be displayed in the campaign studio.

Step 2 (Products): This step requires you to add all your products that you want to the launch before proceeding to the next step to add your targeting/audiences.
Step 3 (Audiences): In this step, you’ll be able to select Targeting options and Audiences based on the products you chose in the previous step. You can then set bids for each selected targeting and audience group. You can either go with the suggested audiences or browse and select audiences based on your specific needs or criteria.

SD Audiences
Step 4 (Creatives): You can choose the creative format for your ad — either Image or Video. There are two options available for the landing page your ad will direct users to:
Product Detail Page – This is to promote individual products
Amazon Store (including subpages) – to drive traffic to your brand's store. If you choose the Amazon Store option, you'll need to select your store and specify the landing page.
For the Image format, you can upload your brand logo, headline, and a custom image.For the Video format, you'll need to upload a video that meets the required specifications. Make sure the creative assets you upload is within the specification limit:
Brand Logo Requirements:
Maximum File Size: 1 MB
Minimum Width: 600 pixels
Minimum Height: 100 pixels
Accepted File Formats: JPEG, JPG, PNG
Custom Image Requirements:
Maximum File Size: 5 MB
Minimum Width: 1200 pixels
Minimum Height: 628 pixels
Accepted File Formats: JPEG, JPG, and PNG
Note: For square images, the cropped dimensions must be at least 628 x 628 pixels.
Video Asset requirements:
Maximum File Size: 500MB
Minimum Frame size: 1920*1080
Aspect Ratio: 16:9
File duration: Must be between 6 seconds and 45 seconds
Format: H.264, MPEG-2, or MPEG-4
Audio: Stereo or mono (AAC or PCM), minimum 192 kbps
Frame Rate: 23.976, 24, 25, or 29.97 fps (constant)

Creatives
Step 5 (Launch Summary) : It displays the summary of all the selections that have been selected on previous steps.

Launch Summary
Introducing ‘Event/Order’ toggle to the Dashboard and ProductVu graphs
We added Event/Order toggle to Dashboard/PV Graphs similar to what’s available in the Financial Reports. This toggle is added to the ‘Trends/Compare’ chart and defaults to ‘Order’.
When switched to ‘Event’, the graph will update accordingly to show the data based on when your events exactly occurred.This gives users a clearer view of data by order date vs. event date, helping them analyze when orders are placed versus when they are actually reconciled.


Updated the AP launch flow to allow users to add keywords and ASINs
We’ve updated the Autopilot campaign launch flow to allow users to add keywords directly to their AP groups. A new ‘Keywords’ step has been added after the ‘ASIN’ tab, enabling users to add keywords that will be applied across all manual campaigns within the AP group. To proceed to the next step, users are now required to add at least one keyword. This will give users more control over their targeting strategy right from the launch process.
Additionally, all the ASINs selected while launching the AP group will be added as ‘asinSameAs’ target to Product Attribute targeting campaigns within the Autopilot group.

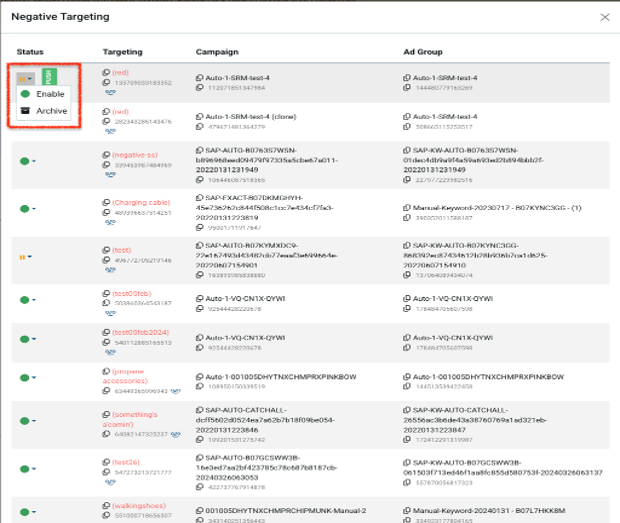
Enhancements to 'Negative Targeting' component
We’ve made enhancements to the ‘Negative Targeting’ component on the Targeting tab to improve the user experience.The component has been updated to allow users to edit statuses directly within the same window, either individually or in bulk — eliminating the need to navigate to the separate ‘Adjust Targeting’ screen.
Key updates include:
A new ‘Status’ option in the ‘Actions’ column, enabling users to edit statuses inline.
A ‘PUSH’ button for performing bulk status updates on selected negative targets.

We now support all available status options for negative targets, allowing users to pause, enable, or archive them as needed.
Additional small enhancements and bug fixes:
Built the support for new product targeting type ‘Expanded ASINs (ASIN_EXPANDED_FROM)’ within Sellozo.
Implemented Genre refinements ‘asinGenreSameAs’ within the Manage Targeting component.
Fixed an issue where the placement bid multiplier was not being correctly filtered for a single campaign on the Placements tab.
Prices for all products in the Sponsored Products and Sponsored Display launch flows now display correctly, resolving an issue where they were previously showing as '0'.
Additionally, an issue was resolved where the Campaign name filter on the Activity Log page was not fetching any search results.

